
Signs Your Faucet Cartridge Needs Replacement
A dripping faucet is often the first sign of a worn cartridge, but it isn’t the only symptom. Because the cartridge controls water flow and temperature, problems can show up in several ways before a leak becomes obvious.
You may need to replace the cartridge if:
-
Water continues dripping after the faucet is fully turned off
-
The handle feels stiff, loose, or difficult to move
-
Water temperature changes unexpectedly
-
Hot and cold water don’t mix properly
-
Water pressure has decreased at a single faucet
-
Water leaks from around the handle rather than the spout
-
The faucet makes squeaking or grinding noises during use
Many homeowners assume they need a completely new faucet when these issues appear. In reality, a worn cartridge is often the only failed component. Replacing it can restore normal operation and extend the life of the fixture for years.
How to Identify the Correct Replacement Cartridge
Before taking the faucet apart, spend a few minutes identifying the correct replacement part. This step prevents unnecessary trips to the hardware store and helps avoid installation problems later.
Start by determining the faucet manufacturer. Common brands found in U.S. homes include Moen, Delta, Kohler, Pfister, American Standard, and Glacier Bay. Most brands use proprietary cartridge designs that are not interchangeable.
If you know the faucet model number, finding the correct replacement is usually straightforward. If not, remove the old cartridge and compare it with replacement options at a plumbing supply store or home improvement center.
Pay close attention to:
-
Cartridge length
-
Stem shape
-
Alignment tabs
-
Number and placement of O-rings
-
Hot and cold water orientation
Step-by-Step Faucet Cartridge Replacement
Understanding how your home’s plumbing system works can make faucet repairs much easier. If you’re unfamiliar with shut-off valves, water supply lines, or common plumbing terminology, read our Basic Plumbing Knowledge for Homeowners guide.
[ca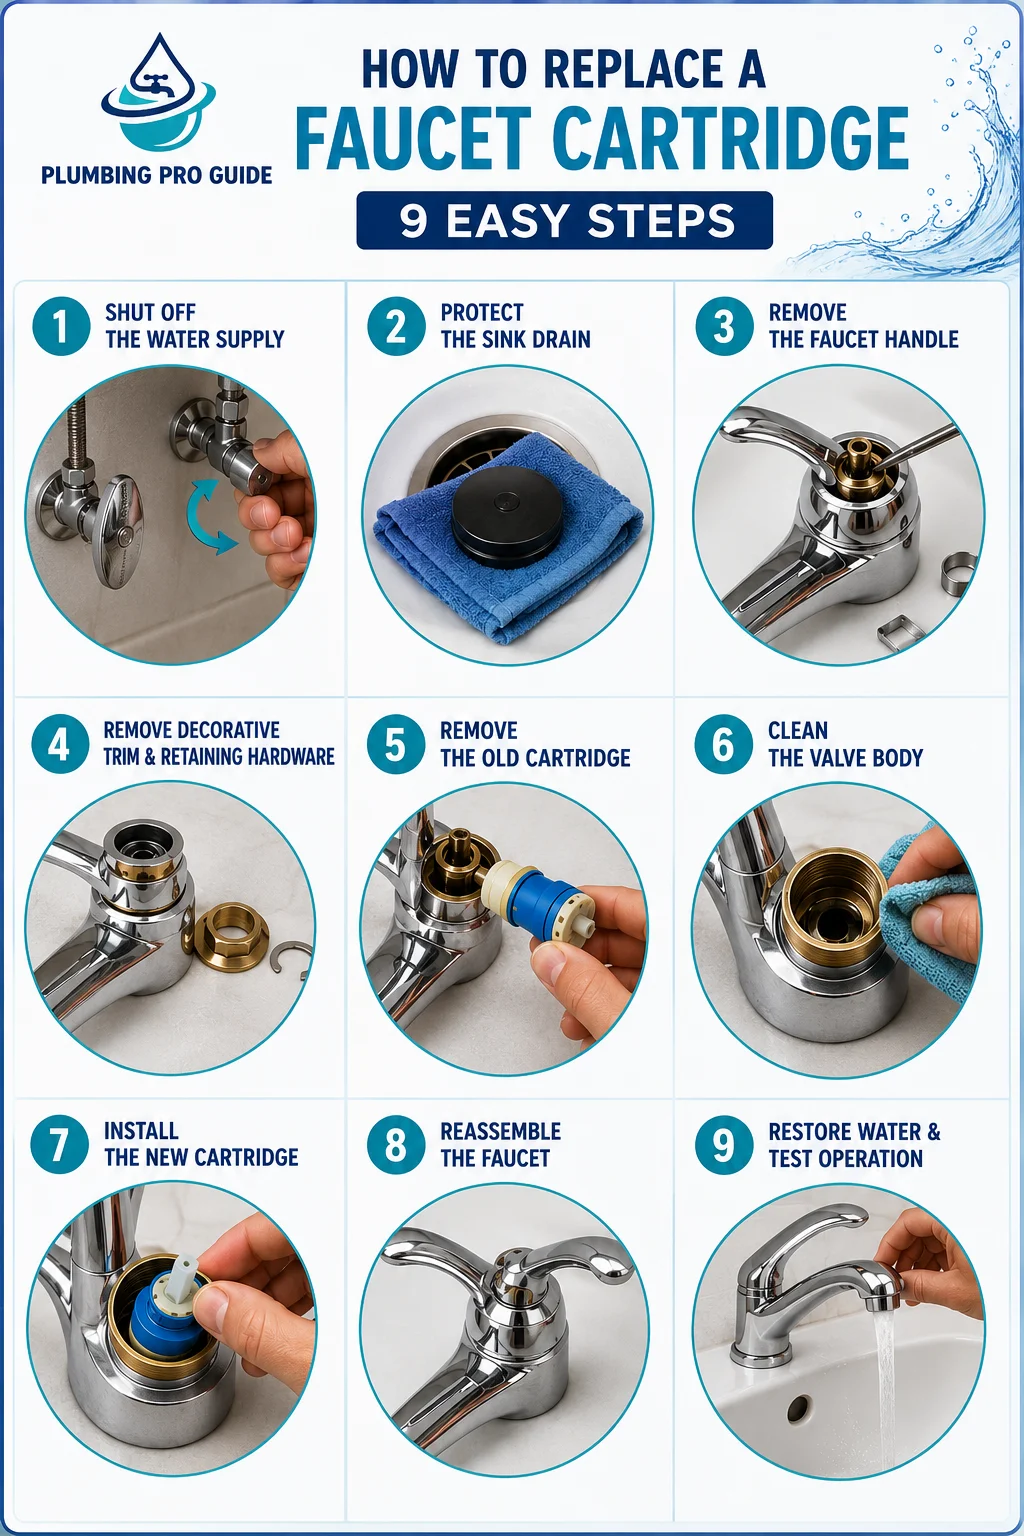
Step 1: Shut Off the Water Supply
Locate the shut-off valves beneath the sink and turn them clockwise until fully closed. Open the faucet afterward to release any remaining pressure in the lines.
If the shut-off valves are damaged or won’t close completely, turn off the home’s main water supply before proceeding.
Step 2: Protect the Sink Drain
Place a stopper or towel over the drain opening. Small screws, clips, and washers can easily fall into the drain during disassembly.
Step 3: Remove the Faucet Handle
Most faucets conceal the handle screw beneath a decorative cap. Carefully remove the cap and loosen the screw using the appropriate tool. If you’re unsure which tools you’ll need before starting, check out our guide on the five essential tools used to remove a bathroom faucet. Depending on the faucet model, this may require a Phillips screwdriver, flathead screwdriver, or Allen wrench.
Step 4: Remove Decorative Trim and Retaining Hardware
Many faucets include a decorative sleeve, retaining nut, or locking clip that secures the cartridge.
Remove these components carefully and set them aside in the order they were removed. Taking a quick photo before disassembly can make reassembly easier.
Step 5: Remove the Old Cartridge
Pull the cartridge straight out whenever possible. Some models slide out easily, while others may require gentle twisting before removal.
If the cartridge has been installed for many years, mineral deposits can make removal more difficult. Avoid forcing it out with excessive pressure, as this can damage the faucet body.
Step 6: Clean the Valve Body
Before installing the replacement cartridge, inspect the valve body for sediment, mineral buildup, or damaged seals.
Wipe away debris using a clean cloth and check that the cartridge chamber is free of obstructions.
This simple step helps ensure a proper seal and can prevent future leaks.
Step 7: Install the New Cartridge
Align the new cartridge according to the manufacturer’s markings and carefully insert it into position.
Many cartridges include tabs or grooves that must line up correctly inside the valve body. If the cartridge doesn’t seat properly, remove it and verify alignment before continuing.
Step 8: Reassemble the Faucet
Reinstall the retaining clip or nut, decorative trim, handle, and any screws removed during disassembly.
Tighten components securely, but avoid overtightening, which can crack plastic parts or damage threads.
Step 9: Restore Water and Test Operation
Slowly reopen the shut-off valves and test the faucet.
Check for:
-
Smooth handle movement
-
Consistent water temperature
-
Proper water pressure
-
Leaks around the handle or spout
If everything functions normally, the repair is complete.
How to Remove a Stuck Faucet Cartridge
Older cartridges often become difficult to remove because of hard water deposits, corrosion, or years of mineral buildup inside the valve body.
If the cartridge won’t come out easily, resist the temptation to force it.
Instead:
-
Apply a penetrating lubricant around the cartridge stem.
-
Allow it to soak for 10 to 15 minutes.
-
Gently rotate the cartridge back and forth with pliers.
-
Pull upward using steady pressure.
-
Use a cartridge puller if recommended by the faucet manufacturer.
A cartridge puller is an inexpensive tool designed specifically for removing seized cartridges without damaging the faucet.
If the cartridge breaks during removal or the valve body becomes damaged, professional assistance may be necessary.
Replacing a Bathroom Faucet Cartridge
Bathroom faucets frequently develop cartridge issues because of mineral deposits, daily use, and age.
Common bathroom faucet symptoms include:
-
Constant dripping
-
Stiff handle movement
-
Poor temperature control
-
Reduced water flow
The replacement process is generally the same as other faucets, but bathroom fixtures often use smaller cartridges and tighter spaces. Taking time to clean mineral buildup from the faucet body before installing the replacement cartridge can improve performance and help extend its lifespan.
Common Mistakes Homeowners Make
Most faucet cartridge replacement problems are caused by small mistakes rather than faulty parts.
Avoid these common issues:
-
Forgetting to turn off the water supply
-
Purchasing the wrong cartridge
-
Losing retaining clips or screws
-
Installing the cartridge backward
-
Skipping valve body cleaning
-
Overtightening retaining nuts
-
Using excessive force during removal
Working carefully and following the manufacturer’s instructions can prevent unnecessary frustration and additional repairs.
When a New Cartridge Won’t Fix the Problem
Although cartridges are responsible for many faucet leaks, they aren’t the only possible cause.
If the faucet continues leaking after replacement, the issue may involve:
-
Damaged O-rings
-
Worn valve seats
-
Corroded internal components
-
Cracked faucet bodies
-
Excessive water pressure
In these situations, additional repairs or complete faucet replacement may be required.
Final Thoughts
A worn faucet cartridge can cause dripping water, poor temperature control, and daily frustration, but replacing it is often one of the most cost-effective plumbing repairs a homeowner can make.
With the correct replacement part, a few basic tools, and a little patience, most homeowners can complete the repair in under an hour and avoid the cost of replacing the entire faucet. More importantly, fixing the problem early can prevent wasted water, higher utility bills, and further wear on the fixture.