To fix a leaking copper pipe without soldering, shut off the water, drain and dry the pipe, then apply one of four no-torch methods: a push-to-connect coupling (permanent), a pipe repair clamp (semi-permanent, years), or epoxy putty / self-fusing silicone tape (temporary). The right choice depends on the leak type — pinhole, split, or failed joint — and whether the line is under full water pressure.
No torch, no flux, no fire risk near your joists. Modern fittings have made it genuinely possible to stop a copper leak permanently without ever lighting a flame — and the temporary fixes below will buy you time when water is actively spraying and the hardware store is closed.
No-solder copper repair methods compared
| Method | Best for | Permanent? | Holds full pressure? | Cost | Time |
|---|---|---|---|---|---|
| Push-to-connect coupling (e.g. SharkBite) | Cracks, burst sections, failed joints | Yes | Yes | $8–$15 / fitting | 15–20 min |
| Compression coupling | Cracks, burst sections | Yes | Yes | $6–$12 / fitting | 20–30 min |
| Pipe repair clamp / sleeve | Pinholes, hairline splits | Semi (years) | Yes | $6–$14 | 10 min |
| Epoxy putty (e.g. JB WaterWeld) | Pinholes, weeping joints, odd shapes | Temporary | Low–medium | $5–$9 | 10 min + cure |
| Self-fusing silicone tape | Hairline leaks, emergencies | Temporary | Low | $7–$12 | 5 min |
| Fiberglass wrap kit (water-activated) | Splits, burst pipe, larger cracks | Semi | Medium | $10–$20 | 10 min + cure |
| Rubber + hose clamp | Pure emergency stopgap | Temporary | Low | $2–$5 | 5 min |
Before you touch the pipe: shut off, drain, and dry
This is the step people skip, and it’s why their repair weeps two hours later. No no-solder fix bonds reliably to a wet, pressurized pipe.
1- Shut off the water:
Use the nearest isolation valve, or the main shutoff (usually where the supply line enters the house, near the meter or in the basement/garage).
2- Drain the line:
Open the lowest faucet in the house and a faucet above the leak. This drops the pressure to zero and lets the standing water run out — critical, because water keeps weeping out of the hole while you work.
3- Dry the pipe completely:
Wipe with a rag, then hit it with a hairdryer or heat gun on low. The surface needs to be bone-dry for tape, putty, and clamps to grip.
4- Sand the repair area:
Scuff the copper with emery cloth or fine sandpaper (120-grit) about an inch on either side of the leak. This removes oxidation and gives clamps and epoxy a clean surface to bite into.
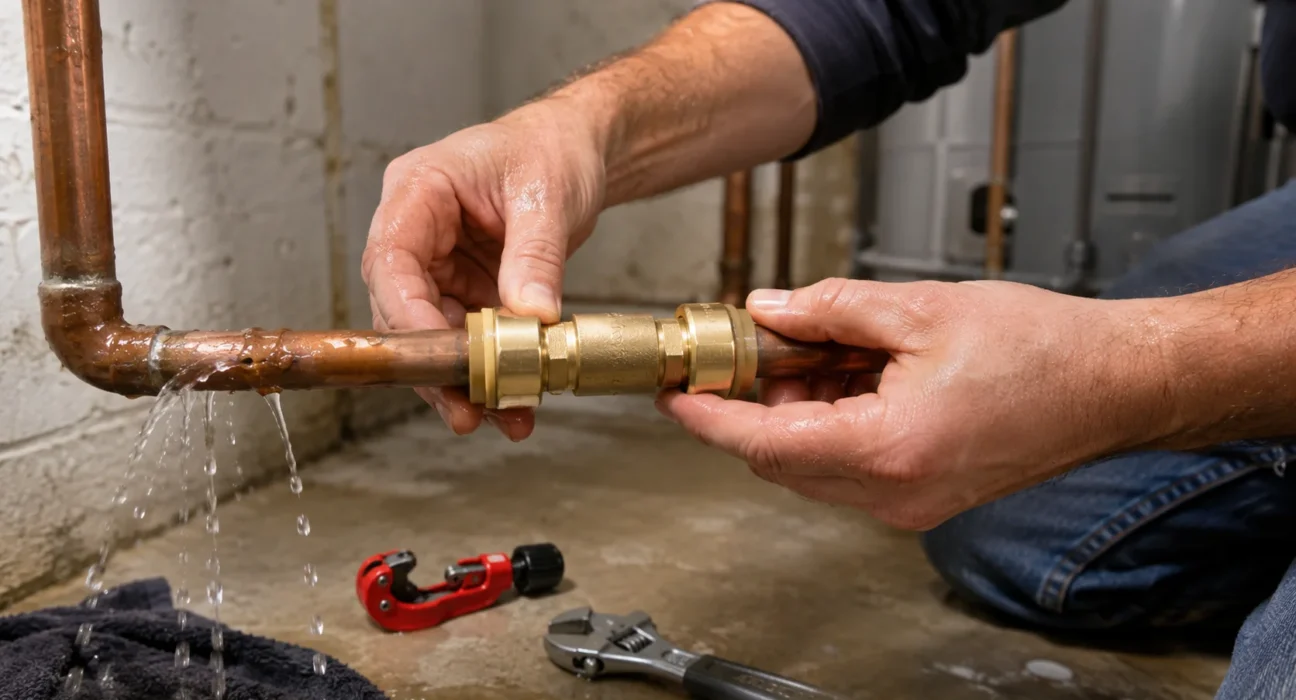
Method 1: Push-to-connect fittings (the permanent no-torch fix)
Push-to-connect (push-fit) couplings like SharkBite are the only no-solder method that gives a permanent, full-pressure repair on a cracked or burst section. You cut out the damaged inch of pipe and push a coupling onto each clean end — no tools, no flame.
Steps:
- Mark and cut out the damaged section with a copper tube cutter. You usually only need to remove 1–2 inches.
- Deburr both cut ends inside and out. This matters more than people realize — a sharp burr will slice the rubber O-ring inside the fitting and cause a slow leak.
- Measure the insertion depth and mark it on the pipe with a marker (most couplings need about ¾”–1″ of pipe inside each end). Marking it is how you confirm the pipe is fully seated.
- Push the coupling on firmly until the pipe hits your mark and the internal teeth grip. You’ll feel it bottom out.
- Slowly turn the water back on and check for weeping.
Method 2: Compression couplings (permanent, slightly more fiddly)
A compression coupling is another permanent, torch-free repair. Like push-fit, you cut out the bad section, but instead of pushing, you tighten a brass nut that compresses a ferrule ring onto the pipe to seal it.
Best for:
The same cracks and burst sections as push-fit, when you want a lower-cost fitting and don’t mind using a wrench.
Steps for Compression couplings:
- Cut out the damaged section and deburr the ends.
- Slide the nut and the ferrule (olive ring) onto each pipe end.
- Seat the coupling body, then hand-tighten the nuts, and finish with a wrench — usually about one-quarter to one-half turn past hand-tight. Don’t over-torque or you’ll deform the ferrule.
- Restore water and check.
A smear of pipe-joint compound on the ferrule helps it seat and seal on the first try. Compression joints can be slightly more leak-prone than push-fit if over- or under-tightened, so snug it in small increments and test.
Method 3: Pipe repair clamp / sleeve
A pipe repair clamp is a two-piece metal sleeve with a thick rubber gasket that bolts over a leak. It seals pinholes and hairline splits in about ten minutes without cutting the pipe, and it holds full pressure.
Best for:
A single corrosion pinhole or a small hairline crack — the most common copper leak there is.
Steps for Pipe repair clamp
- Shut off, drain, dry, and sand the area as above.
- Center the rubber gasket directly over the leak.
- Bolt the two clamp halves together around the pipe, tightening the bolts evenly side to side so the gasket compresses uniformly over the hole.
- Restore water and check the gasket edges for weeping.
The #1 reason clamp repairs weep is the gasket isn’t centered on the hole, or the bolts were tightened unevenly. Snug both bolts a little at a time, alternating, like torquing a wheel.
How long Pipe clamp lasts:
A properly fitted clamp can hold for years and is accepted as a long-term fix in many cases. That said, if it’s on a pipe you can plan to replace, treat it as buying time rather than a forever solution.
Method 4: Epoxy putty
Two-part epoxy putty (like JB Weld WaterWeld or Oatey Fix-It Stick) is a moldable compound you knead and press around a leak. It’s ideal for pinholes, weeping joints, and awkward shapes a rigid clamp can’t wrap — but treat it as a temporary-to-semi-permanent fix. It is best for Pinholes near a joint, a fitting that’s seeping, or any spot where the pipe geometry won’t take a clamp.
Steps for Epoxy putty:
- Shut off, drain, dry, and sand. (Some epoxy putties cure underwater, but every one bonds better to a dry, scuffed surface.)
- Cut off a section, then knead it until the two colors blend into one uniform color — that’s the chemical reaction starting.
- Press it firmly over and around the leak, working it ½”–1″ past the hole in every direction. Feather the edges down onto clean pipe.
- Let it cure fully before restoring water — check the package, but it’s usually 10–60 minutes to handle and up to an hour for full strength.
Wet your fingers to smooth the putty without it sticking to you. Putty is brilliant in a pinch but it won’t flex with the pipe, so on a line that sees temperature swings or vibration, follow up with a proper repair later.
How long Epoxy putty lasts:
Temporary to semi-permanent. Reliable for weeks to months; not what you want long-term on a high-pressure line.
Method 5: Self-fusing silicone tape
Self-fusing silicone tape (Rescue Tape and similar) stretches and bonds to itself not the pipe forming a rubbery seal. It’s a fast emergency stopgap for hairline leaks, not a permanent fix and not for high pressure.
It is best for stopping a small active leak right now, at 2 a.m., until you can get a real fitting.
Steps:
- Dry the pipe as best you can.
- Start wrapping 1–2 inches before the leak, stretching the tape tight as you go (the tension is what makes it fuse).
- Overlap each wrap by half and continue 1–2 inches past the leak. Build up several layers.
- Restore water gradually and watch it.
Method 6: Water-activated fiberglass wrap (for splits and bursts)
A water-activated fiberglass repair wrap is a resin-impregnated bandage you soak and wind around the pipe; it hardens rock-solid in minutes. It’s a strong semi-permanent fix for splits and burst sections, especially on larger-diameter pipe.
Best for:
A freeze-burst split too long for a clamp, or a crack you want reinforced fast without cutting the pipe.
Steps:
- Dry and sand the pipe.
- Dip the wrap in water to activate the resin (wear gloves).
- Wind it tightly around the damaged area, overlapping and extending well past the crack on both sides.
- Smooth it down and let it cure hard — usually 5–30 minutes.
For a confident seal, smear epoxy putty into the actual crack first, then wrap the fiberglass over it. The putty seals; the fiberglass adds structural strength.
How long it lasts:
Semi-permanent. Good for months; still schedule a proper section replacement for a clean fix.
Method 7: Rubber and a hose clamp (pure emergency)
A scrap of rubber pressed over the leak and held with a hose clamp (jubilee clip) is the absolute last-resort stopgap when you have nothing else in the house. It will slow or stop a leak long enough to get supplies.
Cut a patch from a rubber glove, bike inner tube, or a slice of garden hose, wrap it over the leak, and tighten one or two hose clamps over it. Center it on the hole, snug it down, and restore water gently. This is strictly a “stop the flood while I drive to the store” move — replace it with a real fix the same day
Which method should you use?
A quick decision guide:
- Single pinhole, accessible pipe → Repair clamp (fastest) or epoxy putty.
- Crack, split, or burst section → Push-to-connect or compression coupling (permanent), or fiberglass wrap (semi-permanent, no cutting).
- Leaking at a joint/fitting → Epoxy putty around the joint, or cut it out and install a push-fit coupling.
- Active leak, no supplies, after hours → Self-fusing tape or rubber + hose clamp now; proper fix tomorrow.
- You want it done permanently and right → Cut out the bad piece and install a push-to-connect coupling. It’s the closest thing to a soldered repair without the torch.
When to stop DIY-ing and call a licensed plumber
No-solder fixes are great for isolated leaks, but some situations are a signal that patching is the wrong move:
Multiple pinholes along the same run:
When copper develops several pinholes close together, it’s usually corroding from the inside out — often from aggressive water chemistry or pinhole-prone thin-wall pipe. Patching becomes whack-a-mole; that section (or the system) likely needs repiping. A pro can confirm.
The leak is inside a wall, ceiling, or floor:
Concealed leaks risk hidden water damage and mold, and some codes restrict which fittings can be buried. Get eyes on it.
Water near electrical wiring, panels, or fixtures:
Stop and call a professional — that’s a safety issue, not a plumbing convenience.
It’s on the main line or you can’t isolate the water:
Higher pressure and higher stakes.
Persistent blue-green staining or repeat leaks:
That points to a water-quality or whole-system issue worth a professional diagnosis.
How long do no-solder copper repairs actually last?
- Push-to-connect & compression fittings: Permanent — rated 25+ years.
- Repair clamps: Years, when properly fitted; effectively a long-term fix in many cases.
- Fiberglass wrap: Months to a few years as a semi-permanent patch.
- Epoxy putty: Weeks to months.
- Silicone tape & rubber-and-clamp: Days — emergency only.
Frequently asked questions
Can you permanently fix a copper pipe without soldering?
A push-to-connect coupling (such as SharkBite) or a compression coupling both provide a permanent, full-pressure repair on copper without any torch or solder. You cut out the damaged section and install the fitting onto clean, deburred pipe ends.
What is the best way to fix a copper pipe leak without a torch?
For a single pinhole, a pipe repair clamp is fastest. For a crack or burst section, a push-to-connect coupling is the most reliable permanent fix. The “best” method depends on whether the leak is a pinhole, a split, or a failed joint, and whether you need it permanent or just stopped right now.
Will Flex tape or silicone tape stop a copper pipe leak?
Self-fusing silicone tape can temporarily stop a small, low-pressure leak as an emergency measure, but it is not a permanent solution and shouldn’t be relied on for pressurized supply lines. Use it to buy time until you can fit a clamp or coupling.
Can you use epoxy putty on a leaking copper pipe?
Two-part epoxy putty molds around pinholes, weeping joints, and awkward shapes a rigid clamp can’t cover. It’s a temporary-to-semi-permanent fix — bond it to a dry, sanded surface and let it fully cure before restoring water.
Do I have to turn off the water to fix a copper pipe?
Shut off the water and drain the line first. No-solder repairs clamps, putty, tape, and fittings won’t seal reliably on a pipe that’s still under pressure or weeping water. Drying the pipe completely is the single biggest factor in whether the repair holds.
Why does my copper pipe keep getting pinhole leaks?
Recurring pinholes usually mean the pipe is corroding internally, often due to aggressive or acidic water, high water velocity, or thin-wall copper. Individual pinholes can be patched, but multiple leaks on the same run typically mean that section needs replacing, and the water chemistry may need addressing.
Are SharkBite fittings allowed by code?
Push-to-connect fittings are widely code-approved and accepted for permanent repairs, but some local codes restrict their use in concealed (behind-wall) locations to accessible spots only. For exposed pipe they’re generally fine — always confirm with your local plumbing code for buried installations.
How much does it cost to fix a copper pipe without soldering?
Most no-solder repairs cost between $5 and $20 in materials. A repair clamp runs about $6–$14, epoxy putty $5–$9, and a push-to-connect coupling $8–$15. The main extra cost is a copper tube cutter (around $10–$20) if you don’t already own one.