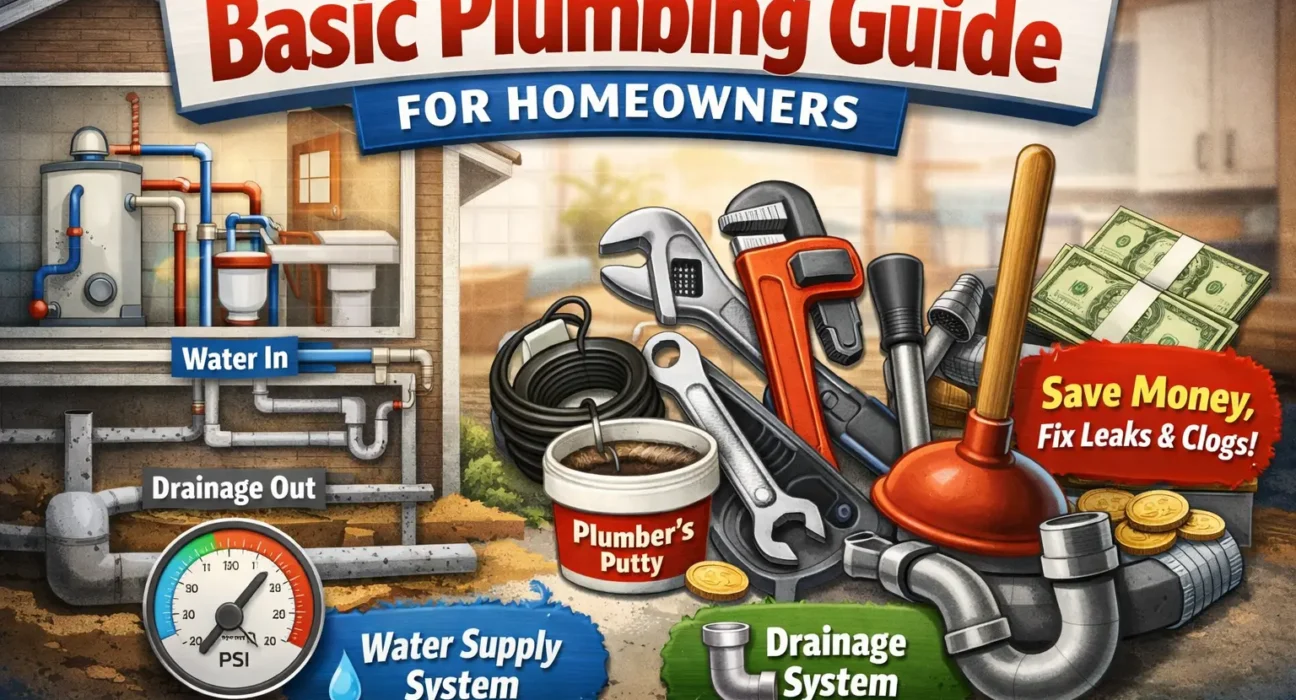
Basic Plumbing Guide for Homeowners
Basic plumbing knowledge involves understanding the two main systems in the house,
- The pressurized water supply system that brings clean water in
- The gravity-based drainage system takes wastewater out.
If homeowners in America learn about how fixtures work, where shutoff valves are located, and how to resolve leaks and clogs, then they can work on the issues by themselves.
Do you know that the average American households incur on plumbing repair annually. According to Angi, the average homeowner spends around $321 per plumbing service call, with costs typically ranging from $177 to $496.
If you understand basic plumbing, you can work on the plumbing issues for your home. In this blog, everything about the pipes, fixtures and water flowing system will be discussed with their solution.
Essential Plumbing Tools for Homeowners
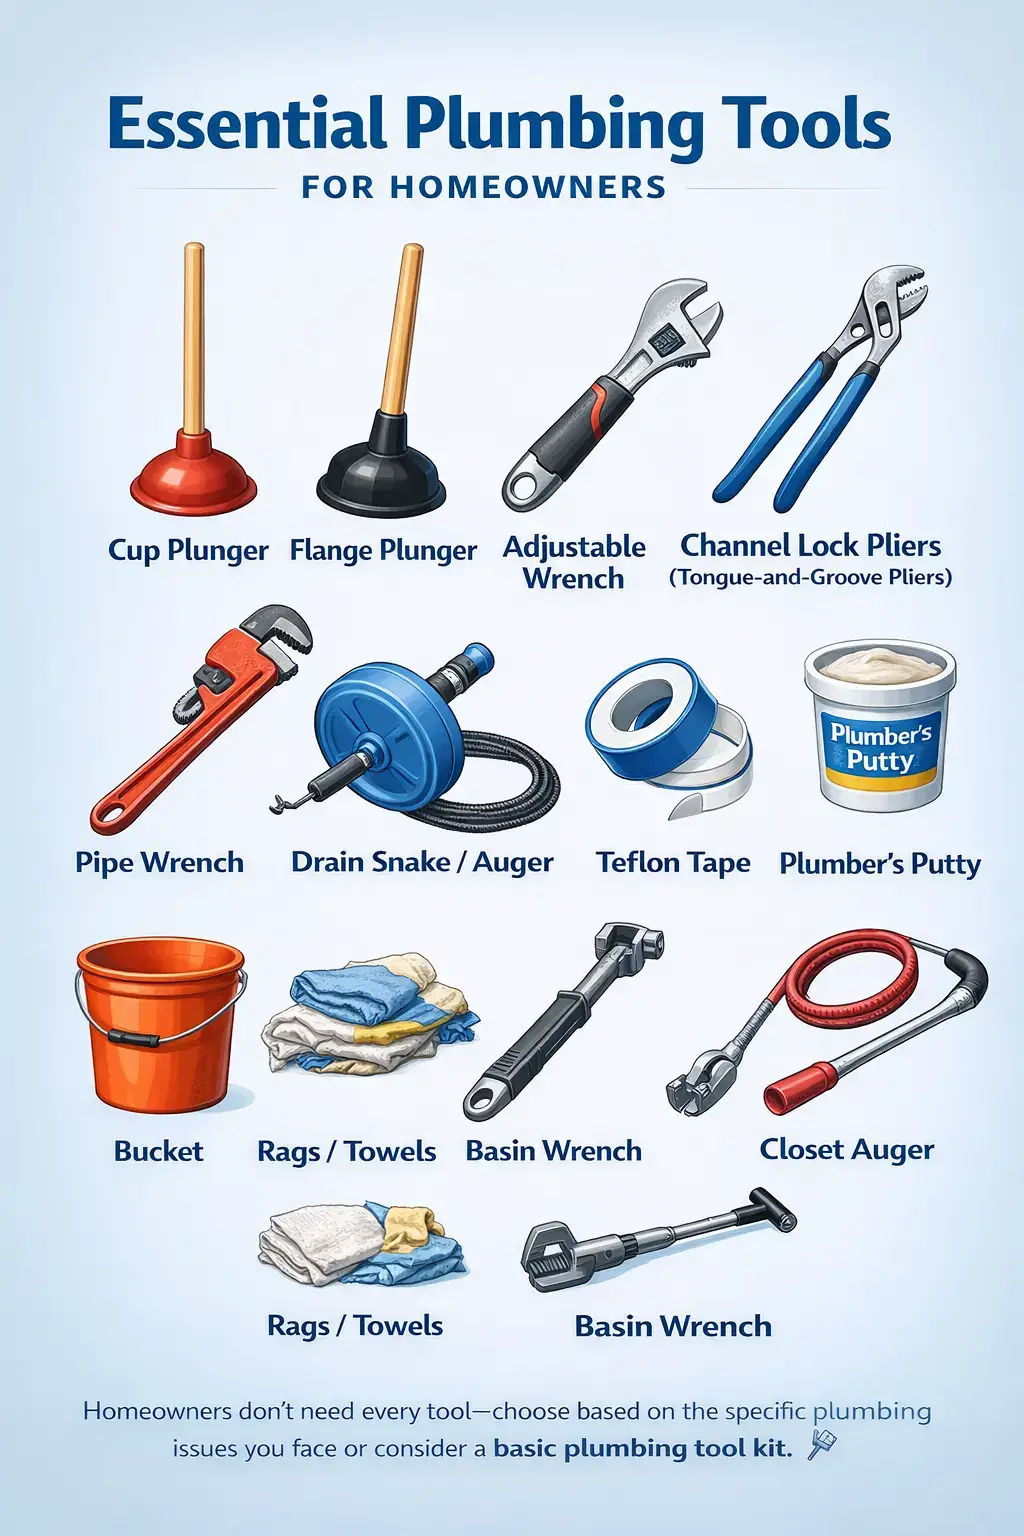
Plungers (Two Types – $10-$25)
- Cup plunger: For sinks, tubs, and showers
- Flange plunger: Specifically designed for toilets with an extended rubber sleeve
Adjustable Wrench ($15-$25)
- 8-inch or 10-inch size works
- Essential for tightening and loosening nuts on supply lines
Channel Lock Pliers ($20-$35)
- Also called tongue-and-groove pliers
- Perfect for gripping pipes and large nuts
- Get the 10-inch size for versatility
Pipe Wrench ($25-$40)
- For gripping and turning pipes
- 14-inch wrench handles most residential needs
- The teeth grip better as you apply more pressure
Drain Snake/Auger ($10-$30)
- 25-foot manual snake for most home drains
- Specifically for clogs beyond the P-trap
- Save hundreds vs calling a plumber for simple clogs
Teflon Tape ($2-$5)
- Seals threaded pipe connections
- Wrap clockwise around threads (direction of tightening)
- Buy the thicker “yellow” tape for gas lines if you have gas appliances
Plumber’s Putty ($5-$8)
- Creates watertight seals around drains and faucets
- Stays pliable, unlike caulk
Bucket and Rags ($10-$15)
- 5-gallon bucket for catching water when disconnecting pipes
- Old towels or rags for cleanup
Basin wrench ($15-$25):
- Reaches nuts in tight spaces behind sinks
Closet auger ($20-$40):
- Specifically designed for toilet clogs
You do not need to buy all the tools. Home owners can consider the plumbing tool kit or analyze what specific areas they are getting an issue, then they can buy tool accordingly.
How Plumbing Works in a House
Plumbing System in the Home
Two systems are working together. The one from which water is coming in is called the supply system and the second where the water is going out is called the drainage system.
Water Supply System Explained
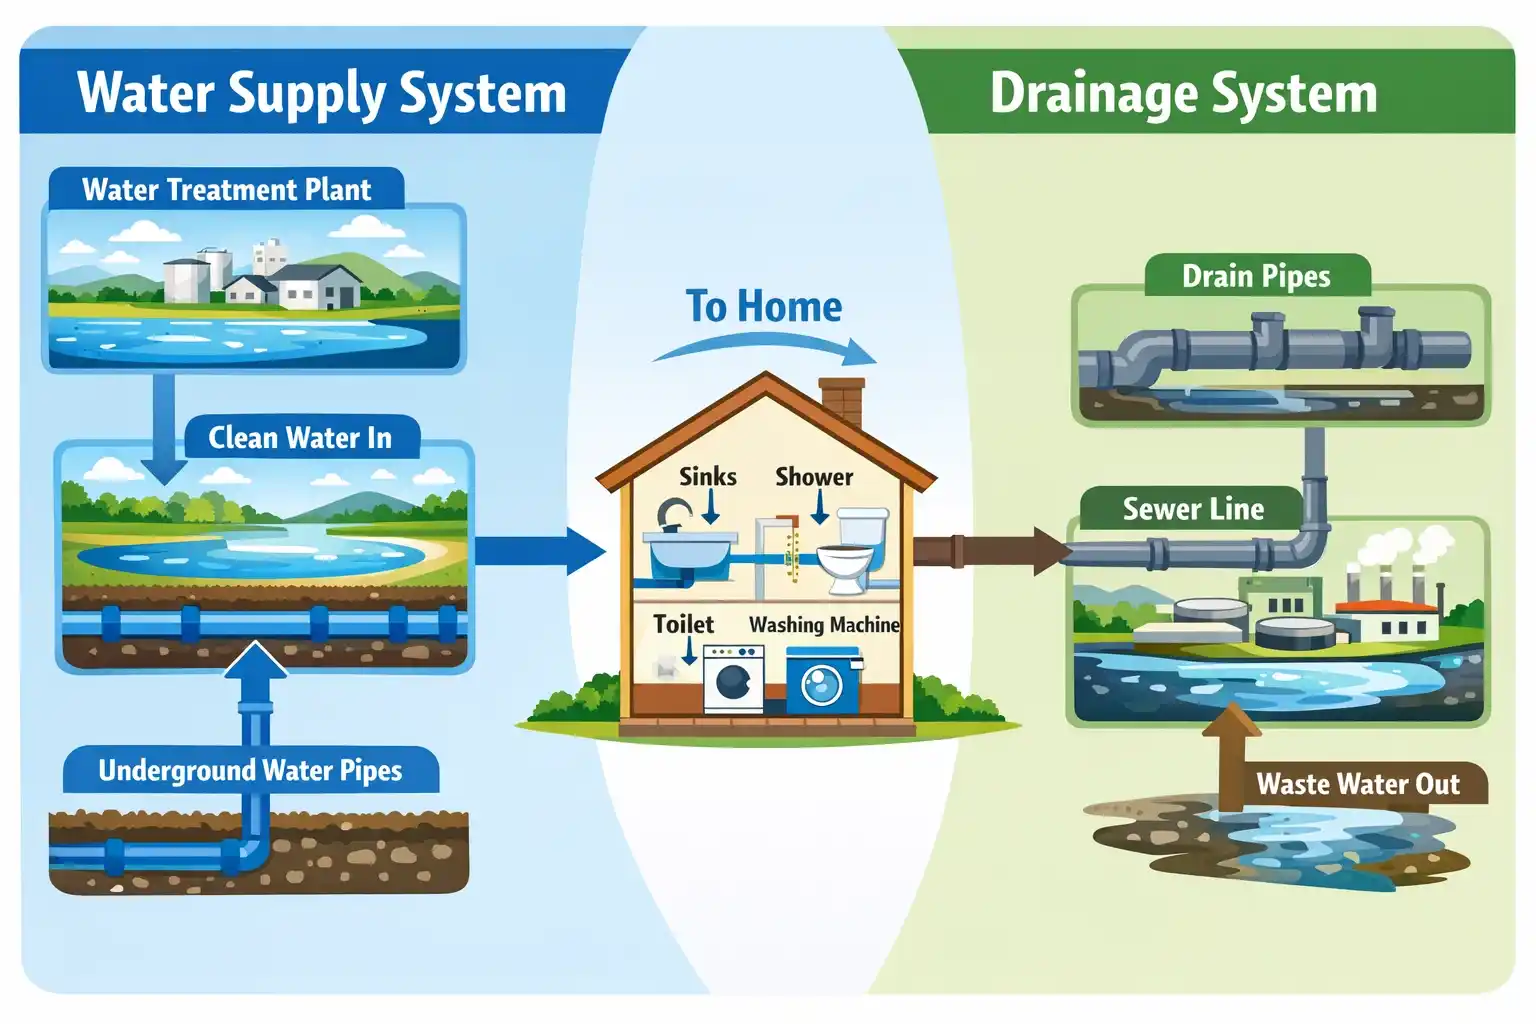
1- Supply System
Water comes from the city main or a private well, it is pushed through pipes throughout your home with enough force to make it travel upstairs, around corners, and out of any faucet you turn on.
In most American homes, cold water enters through a main water line, usually three-quarters of an inch to one inch in diameter. In this scenario, home owner need to find the main shutoff valve. It is located in any of the three areas,
- In the basement near where the main line enters
- In a crawl space on the exterior wall
- Near the water heater
- In a utility room or mechanical closet
When you turn the valve clockwise, all the water to your home shuts off.
Cold and Hot Water Distribution
Cold water splits into two paths
Path 1: Direct to cold water fixtures
- Toilets (cold water only)
- Outdoor hose bibs and sprinkler systems
- Cold side of all faucets
- Washing machine cold inlet
- Refrigerator ice maker
Path 2: To the water heater
- Water gets heated to 120-140°F (120°F recommended to prevent scalding)
- Hot water distributes to all hot water fixtures
- Showers, dishwashers, washing machine hot inlet
- Hot side of all faucets
Understanding Water Pressure
Residential water pressure in the US runs between 40 to 80 PSI (pounds per square inch).
- Below 40 PSI: Showers feel weak, toilets fill slowly, appliances struggle
- 40-60 PSI: Ideal range—strong flow without stress on pipes
- 60-80 PSI: Upper safe range, consider a pressure reducer
- Above 80 PSI: Damaging to pipes, fixtures wear out faster, increased leak risk
You can identify the water pressure problems. Buy a simple pressure gauge at any hardware store for under $15. Screw it onto an outdoor hose bib, turn the water on fully, and read the gauge.
2- Drainage System Explained (Wastewater Out)
Drainage system depends on gravity. Every drain in your home slopes downward at a quarter-inch per foot.
Components in Drainage System
1. Drain Pipes (DWV – Drain, Waste, Vent)
- Toilet drains: 3-4 inches
- Shower/tub drains: 2 inches
- Sink drains: 1.5 inches
- Main sewer line: 4-6 inches
2. Vent Pipes
Vent pipes is the most important part of your drainage system. These pipes poke through your roof and allow air into the drainage system, which:
- Prevents vacuum formation (allows water to flow smoothly)
- Equalizes pressure
- Releases sewer gases safely above your home
3. Traps
Traps are those curved sections of pipe under every sink, shower, and toilet. They hold a small amount of water (typically 2-4 inches) that creates a seal, blocking sewer gases from entering your living space while still allowing wastewater to pass through.
If you smell sewer gas, a trap has dried out or is damaged. Floor drains need water added every few months to maintain the seal. Cleaning a trap is the first step in clearing most drain clogs.
Types of Plumbing Pipes in Homes
The type of pipe in your home depends on when your house was built. Understanding pipe materials helps you know what repairs to expect, what materials to buy, and when replacement might be necessary.
| Pipe Type | Common Use | Pros | Cons | Typical Lifespan | Era |
| Copper | Supply lines | Durable, antimicrobial, heat-resistant | Expensive, requires soldering | 50+ years | 1960-2000s |
| PEX | Supply lines | Flexible, freeze-resistant, DIY-friendly | Can’t use outdoors (UV damage) | 40-50 years | 1990s-present |
| PVC | Drain lines | Affordable, easy to work with, doesn’t corrode | Can’t handle hot water | 50-70 years | 1970s-present |
| CPVC | Supply lines | Heat-resistant plastic, affordable | Becomes brittle over time | 40-50 years | 1980s-2000s |
| Galvanized Steel | Supply lines (old) | Once considered durable | Corrodes internally, reduces flow | 40-50 years | Pre-1960 |
| Cast Iron | Drain lines (old) | Extremely durable, quiet | Heavy, rusts from inside out | 80-100 years | Pre-1980s |
| ABS | Drain lines | Similar to PVC, easier to work with | Not allowed in all areas | 50+ years | 1970s-present |
Copper Pipes
High-quality and long-lasting, but repairs usually require soldering skills or compression fittings. For anything beyond simple supply line replacements, it’s best to hire a professional.
PEX Pipes
A modern, reliable plumbing system that’s very DIY-friendly. Repairs and additions are easy with crimping or clamping tools, which are widely available at hardware stores.
Galvanized Steel Pipes
Common in homes built before 1960. If you notice low water pressure or rusty water, internal corrosion is likely. Plan and budget for eventual replacement with copper or PEX.
Cast Iron Drain Pipes
Durable but aging. Watch for rust, leaks, or changes in drainage sounds. Over time, these typically need to be replaced with PVC.
Mixed Pipe Systems
Very common in many homes. Having copper or PEX supply lines combined with PVC drain lines is standard and completely acceptable.
Plumbing Fixtures and How They Work
Understanding how your fixtures work helps you troubleshoot problems and know what parts to buy.
Faucets: Four Types, Different Repairs
1. Compression Faucets (Oldest Design)
- Separate hot and cold handles that turn multiple rotations
- Washers compress against valve seats to stop water flow
- Most likely to drip—washers wear out
- Repair: Replace rubber washers ($2-5)
2. Ball Faucets (Common in Kitchens)
- Single handle that moves in all directions
- Ball-shaped chamber controls water flow and temperature
- Multiple O-rings and springs can wear out
- Repair: Replace ball assembly ($15-30)
3. Cartridge Faucets (Very Common)
- Single or double handle
- Cartridge moves up/down and rotates to control flow and temperature
- Reliable but cartridge can wear out
- Repair: Replace cartridge ($15-40 depending on brand)
4. Ceramic Disk Faucets (Modern Standard)
- Single handle, lifetime ceramic disk seals
- Most reliable, rarely drip
- If they leak, usually the inlet seals need replacement
- Repair: Replace inlet seals ($10-20)
Universal Faucet Issues:
- Dripping: Internal components worn
- Low pressure: Clogged aerator (unscrew, clean, reinstall)
- Leaking at base: O-rings need replacement
- Handle is loose: Tighten setscrew under decorative cap
How a Toilet Works:
- You push the flush handle
- The chain lifts the flapper valve
- Water rushes from tank into bowl
- This creates a siphon effect that pulls everything down the drain
- The flapper drops back down, sealing the tank
- The fill valve opens, refilling the tank
- The float rises until it reaches the set level
- The fill valve closes
- Ready for next flush
Main Components and Failures:
| Component | Function | Common Problem | Cost to Fix |
| Flapper | Seals tank, releases water when flushed | Warps or deteriorates, causes running | $5-10 |
| Fill Valve | Refills tank after flush | Doesn’t shut off, causes running | $15-25 |
| Float | Signals fill valve to shut off | Misadjusted or damaged | Free to adjust, $10-15 to replace |
| Flush Handle/Chain | Lifts flapper when you flush | Chain too loose/tight or breaks | $10-15 |
| Wax Ring | Seals toilet base to drain | Leaks at base, causes water on floor | $5-15 + labor |
Showerheads and Shower Valves
Showerheads ($15-$200)
- Standard flow: 2.5 GPM (gallons per minute) in the US
- Low-flow options: 1.5-2.0 GPM (save water without sacrificing pressure)
- Easy replacement: Unscrew old, apply Teflon tape to threads, screw on new
- Clean mineral deposits with vinegar soak
Shower Valves (Inside the wall)
- Control water temperature and flow.
- Three types: compression, cartridge, thermostatic.
- If shower temperature fluctuates it may need pressure-balancing valve or cartridge replacement.
Valve
Every valve in your home serves a specific purpose. Knowing their locations and functions is essential for maintenance and emergencies.
Main Shutoff Valve
- Controls ALL water entering your home
- Location: Near where main line enters (basement, crawl space, or outside)
- Critical: Test this valve annually by turning it off and back on
- If it’s stuck or leaking, replace immediately—this valve is your emergency lifeline
Fixture Shutoff Valves
- Located under sinks, behind toilets
- Allow you to shut off water to individual fixtures without affecting whole house
- Common problem: These seize up from lack of use
- Prevention: Exercise them (turn off and on) every 6 months
Water Heater Drain Valve
- At bottom of tank for draining and flushing
- Should be flushed annually to remove sediment
- If it doesn’t close properly after flushing, replacement needed
Hose Bibs (Outdoor Faucets)
- Freeze-resistant models in cold climates
- Shutoff valves inside home protect outdoor faucets in winter
- Fall maintenance: Disconnect hoses, drain lines, close interior shutoffs
Pressure Reducing Valve (PRV)
- Typically located after main shutoff where city pressure is too high
- Set to reduce incoming pressure to safe 50-60 PSI
- Adjustable with a screw or bolt on top
- Lasts 7-12 years before needing replacement
Common Plumbing Problems & DIY Solutions
Understanding what is causing your plumbing issues helps you fix them faster and more affordably.
Drips, Leaks, and Running Water
The Cost of Ignoring Leaks:
- One drip per second = 3,000 gallons/year = $35+ on water bill
- Running toilet = 200 gallons/day = $73/month = $876/year
- Small pipe leak = potential thousands in water damage
Dripping Faucet Diagnosis:
Most common causes:
Worn washer or O-ring (compression faucets)
Turn off water, remove handle, replace washer ($2-5 part, 20 minutes)
Bad cartridge (cartridge or ceramic disk faucets)
Remove handle, pull cartridge, buy matching replacement ($15-40, 30 minutes)
Worn valve seat (causes drips from spout)
Requires reseating tool or replacement ($5-15, 45 minutes)
Leaks Under Sinks:
That puddle under your sink probably came from one of these sources:
Supply Line Connections
- Symptom: Water at connection points
- Cause: Loose connections or worn ferrules
- Fix: Tighten first (don’t overtighten!). If still leaking, turn off water and replace ferrule and nut ($3-5)
P-Trap Issues
- Symptom: Water dripping from curved pipe underneath
- Cause: Loose slip nuts or cracked trap
- Fix: Tighten slip nuts by hand (they’re designed for hand-tightening). Replace trap if cracked ($8-15 for new P-trap)
Drain Assembly
- Symptom: Water around drain basket in sink
- Cause: Deteriorated plumber’s putty or worn gasket
- Fix: Remove drain assembly, clean old putty, apply new putty or replace gasket ($5-10)
Running Toilet Solutions:
A running toilet is usually one of three issues:
Problem 1: Flapper Doesn’t Seal
- Test: Add food coloring to tank, wait 15 minutes without flushing, check bowl
- If colored water appears in bowl, flapper is leaking
- Solution: Replace flapper ($5-10, 10 minutes)
- Tip: Bring old flapper to hardware store to match exact model
Problem 2: Fill Valve Won’t Shut Off
- Symptom: Water continuously flows through overflow tube
- Cause: Faulty fill valve or debris in valve
- Solution: Try cleaning valve first, replace if needed ($15-25, 20 minutes)
Problem 3: Float Set Too High
- Symptom: Water level above overflow tube
- Solution: Adjust float height so water stops 1 inch below overflow tube (free, 2 minutes)
Clogs: Different Types, Different Solutions
Not all clogs are created equal. The location and severity determine your approach.
Slow-Draining Sink:
Kitchen Sink:
- Grease, food particles, soap scum buildup
- DO NOT use chemical drain cleaners regularly—they damage pipes over time
- Solutions in order of try:
- Remove and clean P-trap (80% success rate, 15 minutes)
- Use sink plunger with wet rag blocking overflow (50% of remaining clogs)
- Snake drain beyond P-trap (fixes nearly all remaining clogs)
Bathroom Sink:
- Most likely cause: Hair and soap scum at pop-up stopper
- Solutions:
- Remove pop-up stopper, clean hair and gunk (fixes 70% of clogs, 5 minutes)
- Clean P-trap (fixes another 20%)
- Snake drain if needed (remaining 10%)
Completely Blocked Toilet
Tools you’ll need:
- Flange plunger (not a cup plunger!)
- Towels for protection
- Bucket
- Closet auger if plunger fails
Step-by-step approach:
- Stop the overflow: If water is rising, immediately remove tank lid and push the flapper down to stop flow
- Assess the situation: If bowl is full, bail out excess water into bucket
- Plunge correctly:
- Insert flange into drain opening
- Create complete seal
- Push down gently first to eliminate air
- Then plunge vigorously 15-20 times
- Pull plunger away sharply at the end
- Test flush: If water swirls and drains, you’ve won
- If still clogged: Use closet auger
- Insert curved end into trap
- Crank handle while pushing forward
- This breaks up or hooks the clog
Shower Drain Clogs (Hair Central)
If the drain is completely blocked your shower because the drain is completely blocked. That’s almost always hair accumulation.
Prevention is key:
- Install a hair catcher ($5-10)—easiest solution ever
- Saves you from ever dealing with hair clogs
If already clogged:
- Remove drain cover (unscrew or pry up)
- Use needle-nose pliers or zip-it tool to pull out hair clog
- Run hot water to clear remaining soap scum
- Replace drain cover
For stubborn shower clogs:
- Use drain snake through the drain opening
- May need to remove overflow cover and snake through overflow
Water Pressure Issues
High Water Pressure (Over 80 PSI)
Symptoms:
- Banging pipes (water hammer)
- Leaking fixtures
- Appliances wearing out quickly
- Toilet fill valves failing repeatedly
Solution: Install or adjust pressure-reducing valve (PRV)
- Turn adjustment screw clockwise to reduce pressure
Low Water Pressure (Below 40 PSI)
Systematic diagnosis:
- Test at multiple fixtures: All low or just one?
- If all fixtures have low pressure:
- Check main valve—is it fully open?
- Check pressure at outdoor hose bib
- Contact water company to verify pressure at meter
- May have corroded pipes reducing flow (galvanized steel commonly)
- If only hot water has low pressure:
- Sediment buildup in water heater restricting flow
- Solution: Flush water heater, may need full drain and flush
- If only one fixture has low pressure:
- Remove and clean aerator (10-minute fix, fixes 80% of single-fixture issues)
- If shower head: Mineral deposits clogging holes
- If one sink faucet: Shutoff valve not fully open or cartridge clogged
Gurgling Drains
When you flush the toilet, does your bathroom sink start making a strange gurgling noise? Or maybe your kitchen sink causes the washing machine standpipe to gurgle? What’s really going on here?
If all drains gurgle:
- Main vent stack may be blocked (leaves, bird nest, ice in winter)
- Main drain line partially clogged
- Call a plumber, this requires expertise
If only one fixture gurgles:
- Individual vent blocked or improperly installed
- P-trap partially clogged
- Try cleaning P-trap and snaking drain first
Whistling or Squealing
High-pitched noise when running water.
Common causes:
- Worn washers in faucets vibrating
- Water pressure too high causing pipes to vibrate
- Partially closed valve creating turbulence
Solutions:
- Identify which fixture makes noise
- If from faucet: Replace washers or cartridge
- If from anywhere: Check water pressure and reduce if needed
- If from toilet: Replace fill valve (often the culprit)
Frozen Pipes Prevention and Recovery
If you live anywhere that gets below freezing, understanding frozen pipes is crucial. A burst pipe can cause $5,000-$10,000 in water damage.
Pipes Most at Risk:
- Exterior walls
- Unheated areas (garage, crawl space, attic)
- Kitchen and bathroom sinks against exterior walls
- Outdoor hose bibs
Prevention (Before It Freezes):
Temperature drops to 20°F or below:
- Disconnect and drain all garden hoses
- Close interior shutoff valves to outdoor faucets
- Open outdoor faucets to drain remaining water
- Open cabinet doors under sinks on exterior walls (lets warm air in)
- Let faucets drip slightly (moving water doesn’t freeze as easily)
- Keep thermostat at 55°F minimum if leaving town
Insulate vulnerable pipes:
- Foam pipe insulation ($1-2 per 6-foot length)
- Heat tape for extreme situations ($20-40 per section)
If Pipes Freeze (But Haven’t Burst Yet):
Warning signs:
- No water from faucet
- Only a trickle comes out
- Frost visible on exposed pipes
Emergency response:
- Open the faucet – Allows melting water to escape and relieves pressure
- Apply heat gradually – Use hair dryer, heat lamp, or warm towels
- NEVER use: Blowtorch, propane heater, or other open flame
- Work from faucet toward frozen area – This allows trapped water to escape
- If pipe is inside wall: Turn up heat, open cabinets, wait
If Pipe Has Already Burst:
- Shut off main water supply IMMEDIATELY
- Turn off electricity to affected area if water is near outlets
- Open faucets to drain remaining water
- Call plumber for repair
- Document damage for insurance
- Start cleanup/drying process immediately to prevent mold
Types of Water Heaters
Tank Water Heaters (Most Common – 85% of US Homes)
How they work
Store 30-80 gallons of hot water, constantly maintaining temperature
Pros:
- Lower upfront cost ($400-$1,200 installed)
- Simple technology, easy repairs
- Work during power outages (gas models)
- Reliable and proven
Cons:
- Constantly heat water even when not in use (standby heat loss)
- Can run out of hot water during high demand
- Take up floor space
- 8-12 year lifespan on average
- Risk of catastrophic leak/flood when tank fails
Tankless Water Heaters
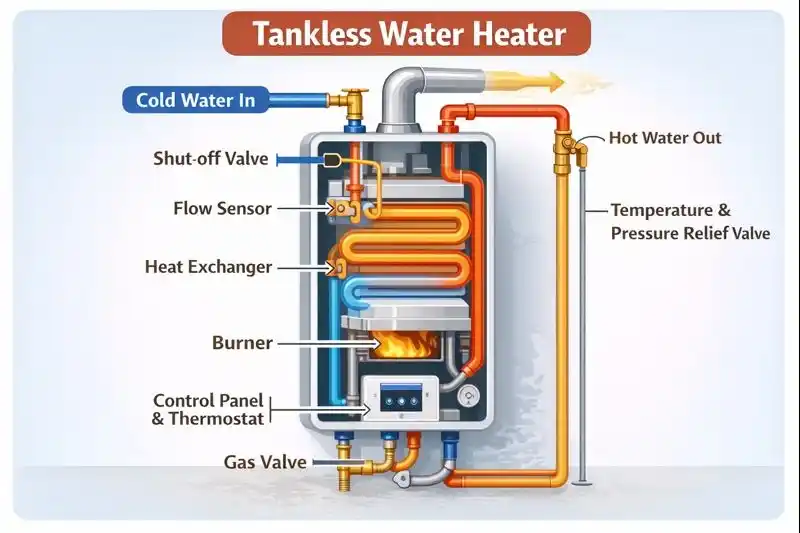
How they work: Heat water instantly as it flows through the unit (on-demand)
Pros:
- Never run out of hot water
- 20-40% more energy efficient
- 20+ year lifespan
- Small, wall-mounted (saves space)
- No risk of tank flood
Cons:
- Higher upfront cost ($1,000-$3,000+ installed)
- May need electrical service upgrade
- Can’t supply multiple high-demand fixtures simultaneously without proper sizing
- More complex repairs
- Temperature fluctuations if flow rate drops
Heat Pump Water Heaters
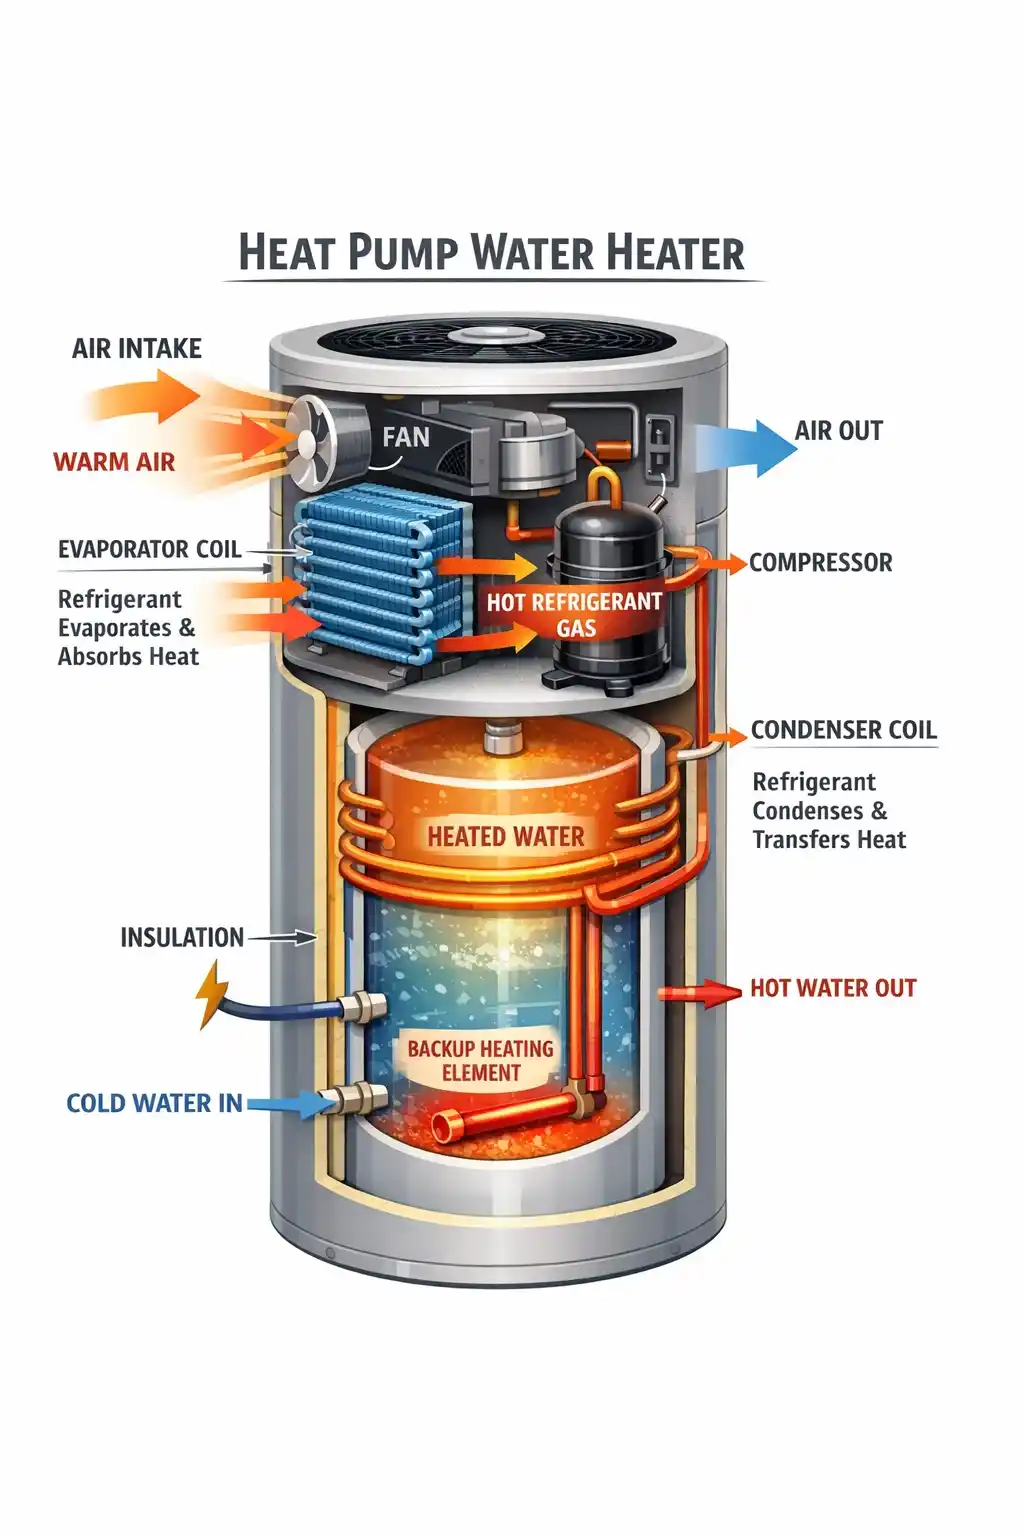
- Pull heat from air to warm water
- 2-3x more efficient than standard electric
- Qualify for federal tax credits
- Higher upfront cost but lowest operating cost
- Best for warm climates
Flushing Your Water Heater removes sediment that builds up at the bottom of the tank. This sediment:
- Reduces efficiency (heater works harder)
- Causes rumbling/popping noises
- Reduces available hot water
- Shortens tank lifespan
- Damages heating elements (electric heaters)
How to Flush (30-45 Minutes):
- Turn off power/gas
- Electric: Flip breaker
- Gas: Turn dial to “pilot” or “vacation”
- Let water cool (2-3 hours) or proceed carefully with hot water
- Close cold water inlet valve (top of heater)
- Connect garden hose to drain valve (bottom of heater)
- Run hose to drain, floor drain, or outside
- Open hot water faucet somewhere in house (breaks vacuum, allows draining)
- Open drain valve and let tank empty
- When empty, briefly open cold inlet valve (flushes remaining sediment)
- Close drain valve, remove hose
- Open cold inlet valve, fill tank
- When hot faucet runs steady (no sputtering air), close it
- Turn power/gas back on
- Wait 1-2 hours for water to reheat
You can confidently handle these repairs yourself with basic tools and instruction.
FAQs
How often should a home plumbing system be inspected?
Most homes should have their plumbing system inspected every two to three years, while older homes or homes with previous plumbing issues benefit from annual inspections to catch leaks, corrosion, and pressure problems early.
Which plumbing upgrades add the most value to a home?
Plumbing upgrades such as replacing old galvanized pipes with PEX or copper, installing low-flow fixtures, upgrading the water heater, and adding a pressure-reducing valve add value by improving efficiency, safety, and long-term reliability.
How can I tell if there is a hidden water leak in my home?
Hidden leaks are often indicated by unexplained increases in water bills, musty odors, peeling paint, damp walls, or a water meter that continues to run when all fixtures are turned off.
What is the most common plumbing mistake homeowners make?
The most common plumbing mistake homeowners make is overtightening fittings, which damages washers, cracks plastic components, and often creates leaks instead of preventing them.
Can plumbing problems affect indoor air quality?
Plumbing problems can negatively affect indoor air quality when sewer gases escape from dry traps, mold develops from hidden leaks, or drainage systems are improperly vented.
How long do plumbing fixtures usually last in a home?
Most plumbing fixtures last between 10 and 30 years depending on usage, water quality, and maintenance, with faucets and valves wearing out sooner than toilets and drain components.
Is hard water harmful to plumbing systems?
Hard water damages plumbing systems over time by causing mineral buildup inside pipes and fixtures, reducing water flow, clogging components, and shortening the lifespan of water heaters.
Why does tap water sometimes smell bad even if it looks clean?
Unpleasant water odors are commonly caused by bacteria, stagnant water in unused pipes, or a deteriorating anode rod inside the water heater rather than visible contamination.
How can homeowners improve plumbing energy efficiency?
Plumbing energy efficiency improves when hot water pipes are insulated, leaks are repaired quickly, water heater temperatures are set correctly, and outdated fixtures are replaced with water-efficient models.
Do plumbing codes matter for small home repairs?
Plumbing codes matter even for small repairs because they ensure proper drainage, safe water delivery, and compliance with insurance and resale requirements.